
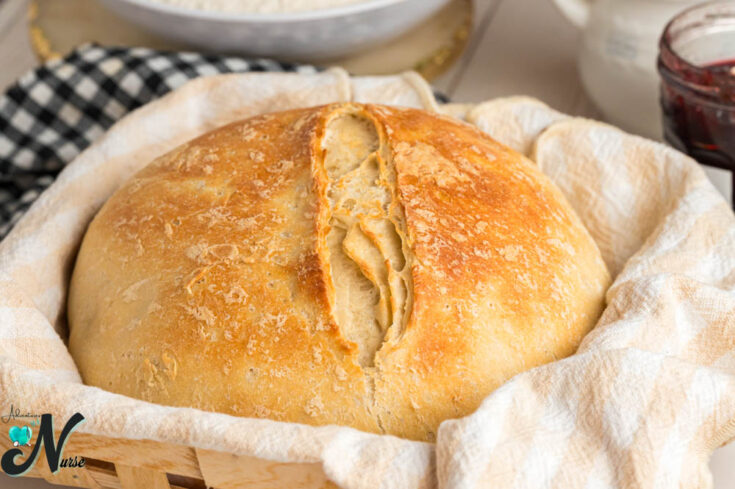
This Crusty Italian Bread recipe is a staple in my kitchen. The combination of a crispy, golden-brown crust and a soft, chewy interior makes it irresistible. The aroma that fills the house while it’s baking is enough to make your mouth water.
I love to enjoy this bread on its own, warm out of the oven, with a pat of butter or a drizzle of olive oil. It’s also perfect for dipping into a hearty soup or a rich marinara sauce. The crust holds up well to dipping, providing a satisfying crunch with each bite.

Join us on this exciting Adventure as we delve into the art of making traditional Italian bread. Throughout this experience, we will guide you through each step of the process of how to make Italian bread, from selecting the finest ingredients to mastering the techniques of kneading and shaping the dough.
What you’ll love about this recipe:
French Bread VS Italian Bread
French Bread and Italian Bread, though both iconic staples in the world of baking, boast distinct characteristics that make them stand out. French Bread, epitomized by the classic baguette, showcases a slender shape with a crisp, golden crust and a soft, airy interior. On the other hand, Italian Bread encompasses a broader range of shapes and textures, often featuring a thicker, chewier crust and a denser, softer crumb. While French Bread is renowned for its simplicity and versatility, perfect for sandwiches or as a side to any meal, Italian Bread offers a heartier, more rustic appeal, ideal for dipping in olive oil or serving alongside pasta dishes. Both bread varieties capture the essence of their respective culinary traditions, each with its unique charm and flavor profile.
Italian Bread Ingredients

Crusty Italian Bread Recipe
- In a small bowl, mix the warm water, active dry instant yeast, and sugar. Allow it to sit for about 5-10 minutes until the mixture becomes frothy.
- In a large mixing bowl, whisk together the bread flour and salt. Create a well in the center, then add the activated yeast mixture and olive oil.


- Stir the ingredients until a dough begins to form. Transfer the dough onto a lightly floured surface and knead for approximately 10 minutes, or until it is smooth and elastic.
- Place the kneaded dough into a greased bowl, turning it once to coat the top with oil. Cover with a clean kitchen towel and let it rise in a warm environment for about 1 to 1.5 hours, or until it has doubled in size.


- Preheat your oven to 450°F (232°C) with a Dutch oven inside it for at least 30 minutes before baking to get it hot.
- After the dough has risen, punch it down gently and turn it out onto a lightly floured surface. Shape the dough into a round loaf.
- If desired, sprinkle a piece of parchment paper with cornmeal and place the shaped dough on it. This step is optional but helps prevent sticking and adds a bit of texture to the bottom of your bread.
- Cover the dough again with the towel and allow it to rise for an additional 30 minutes.


- Carefully remove the hot Dutch oven from your preheated oven. Lift the dough using the parchment paper and lower it into the Dutch oven. (If not using parchment, simply place the dough directly into the Dutch oven.)
- Cover with the lid and bake in the preheated oven for 25 minutes.
- After 25 minutes, remove the lid and continue to bake for another 15-20 minutes, or until the bread is golden brown and sounds hollow when tapped.
- Remove the Dutch oven from the oven, and carefully lift out the homemade Italian bread. Let it cool on a wire rack before slicing. Enjoy!
Chef Notes:
- The use of a Dutch oven in this recipe for Italian bread mimics the steamy environment of a professional baker’s oven. This steam helps to develop a beautiful, crispy crust on the bread.
- If you don’t have a Dutch oven, you can try creating a steamy environment in your oven by placing a pan of water on the bottom rack during baking.
- You can adjust the flavor of your bread by adding dry herbs or fresh herbs like rosemary or thyme to the dough for an aromatic twist.
- This bread is best enjoyed the day it is baked but can be stored in an airtight container or bread bag to maintain freshness for up to 2 days. For longer storage, you can slice and freeze the bread.
Tips & Tricks
- Preheat Your Oven: Always preheat your oven before baking bread to ensure even cooking and a perfectly crusty exterior.
- Use High-Quality Ingredients: Quality flour, yeast, salt, and water are essential for great-tasting bread.
- Knead Properly: Kneading the dough helps develop gluten, giving your bread its structure and texture.
- Proof the Yeast: Make sure your yeast is active by proofing it in warm water with a pinch of sugar. It should bubble and froth within a few minutes.
- Cover Dough While Rising: Cover your dough with a damp cloth or plastic wrap while it rises to prevent it from drying out.
- Slash the Dough: Before baking, make shallow slashes on the surface of the dough with a sharp knife or razor blade. This helps the bread expand properly in the oven.
- Create Steam: Place a pan of hot water in the bottom of the oven while baking to create steam. This helps give your bread a crispy crust.
- Cool Properly: Allow your homemade bread to cool on a wire rack before slicing. Cutting into it too soon can cause it to become gummy.
Our
Favorite Breads
FAQs for Homemade Italian Crusty Bread

Ways to Use Italian Loaf of Bread
- Olive Oil Dipping Sauce: Whip up a simple bread dipping oil recipe with herbs like basil, oregano, garlic, and red pepper flakes. Mix these ingredients with olive oil and a splash of balsamic vinegar for a flavorful dip.
- Bruschetta: Top slices of toasted Italian bread with diced tomatoes, fresh basil, garlic, and a drizzle of olive oil for a classic appetizer.
- Rigatoni Bolognese: This bread is perfect for dipping in a Nice Rigatoni Bolognese Rigatoni Bolognese is a hearty Italian pasta dish featuring tube-shaped rigatoni noodles smothered in a rich and savory meat sauce

Crusty Italian Bread
This Crusty Italian Bread recipe is a staple in my kitchen. The combination of a crispy, golden-brown crust and a soft, chewy interior makes it irresistible. The aroma that fills the house while it’s baking is enough to make your mouth water.
Ingredients
- 4 cups bread flour
- 1 1/2 cups warm water (110°F to 115°F)
- 2 1/4 teaspoons active dry yeast
- 1 1/2 teaspoons salt
- 1 tablespoon granulated sugar
- 2 tablespoons olive oil
- Cornmeal, for dusting (optional)
Instructions
- In a small bowl, mix the warm water, active dry instant yeast, and sugar. Allow it to sit for about 5-10 minutes until the mixture becomes frothy.
- In a large mixing bowl, whisk together the bread flour and salt. Create a well in the center, then add the activated yeast mixture and olive oil.
- Stir the ingredients until a dough begins to form. Transfer the dough onto a lightly floured surface and knead for approximately 10 minutes, or until it is smooth and elastic.
- Place the kneaded dough into a greased bowl, turning it once to coat the top with oil. Cover with a clean kitchen towel and let it rise in a warm environment for about 1 to 1.5 hours, or until it has doubled in size.
- Preheat your oven to 450°F (232°C) with a Dutch oven inside it for at least 30 minutes before baking to get it hot.
- After the dough has risen, punch it down gently and turn it out onto a lightly floured surface. Shape the dough into a round loaf.
- If desired, sprinkle a piece of parchment paper with cornmeal and place the shaped dough on it. This step is optional but helps prevent sticking and adds a bit of texture to the bottom of your bread.
- Cover the dough again with the towel and allow it to rise for an additional 30 minutes.
- Carefully remove the hot Dutch oven from your preheated oven. Lift the dough using the parchment paper and lower it into the Dutch oven. (If not using parchment, simply place the dough directly into the Dutch oven.)
- Cover with the lid and bake in the preheated oven for 25 minutes.
- After 25 minutes, remove the lid and continue to bake for another 15-20 minutes, or until the bread is golden brown and sounds hollow when tapped.
- Remove the Dutch oven from the oven, and carefully lift out the homemade Italian bread. Let it cool on a wire rack before slicing. Enjoy!
Notes
- The use of a Dutch oven for this recipe mimics the steamy environment of a professional baker’s oven. This steam helps to develop a beautiful, crispy crust on the bread.
- If you don’t have a Dutch oven, you can try creating a steamy environment in your oven by placing a pan of water on the bottom rack during baking.
- You can adjust the flavor of your bread by adding herbs like rosemary or thyme to the dough for an aromatic twist.
- This bread is best enjoyed the day it is baked but can be stored in an airtight container or bread bag to maintain freshness for up to 2 days. For longer storage, you can slice and freeze the bread.
Recommended Products
As an Amazon Associate and member of other affiliate programs, I earn from qualifying purchases.


2 Comments