
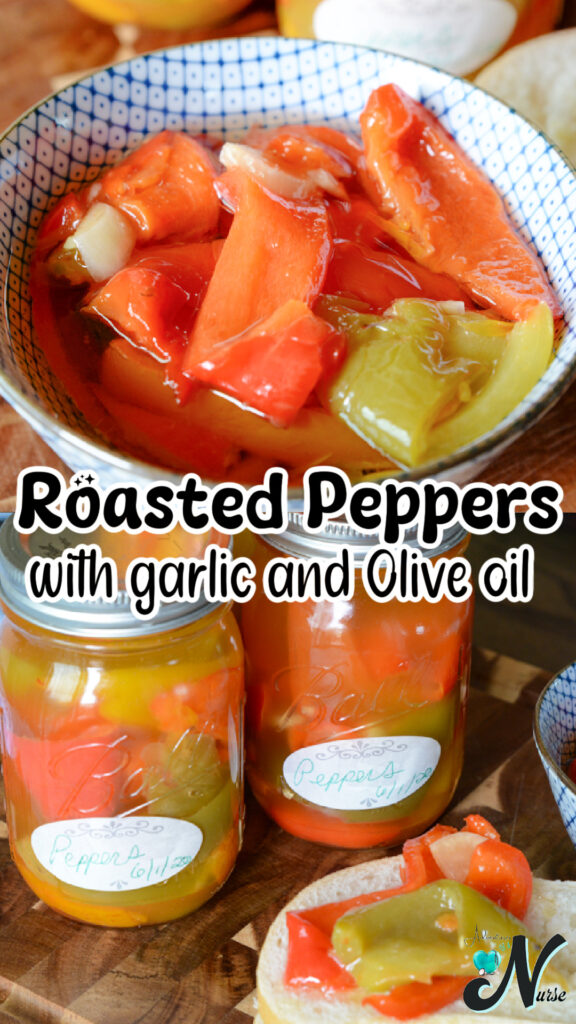
Roasted Peppers with Garlic and Olive Oil are made with sweet bell peppers roasted until tender, then combined with fresh garlic and olive oil. They’re simple, flavorful, and easy to keep in the refrigerator for adding to sandwiches, pasta, salads, and more.
I make these peppers all the time and keep them in the refrigerator so they’re ready when I need them. Roasting brings out the sweetness in the peppers, while the garlic and olive oil add plenty of flavor.

Why I Love Roasted Peppers
About the Ingredients ⭐
- Sweet Peppers: Use a mix of colors for plenty of sweet pepper flavor.
- Garlic: Chopped fresh garlic adds lots of flavor.
- Olive Oil: Coats the roasted peppers and gives them a rich flavor.
- Water: Added to the roasting pan while the peppers cook.
Be sure to check out the full recipe and ingredient list below
How to Make Roasted Peppers with Garlic and Olive Oil
Roast the peppers: Preheat the oven to 350°F. Place the whole peppers on a baking sheet and add 1 cup of water to the bottom of the pan. Roast for about 1 hour, or until tender.

Cool the peppers: Immediately place the hot roasted peppers in a brown paper bag. Close the bag and let them cool completely. This helps loosen the skins.

Peel and slice: Peel the skins from the cooled peppers. Remove the seeds and slice the peppers into strips.
Add the garlic and oil: Place the sliced peppers in a large bowl and add the olive oil and chopped garlic. Toss to combine.

Tips I Found Helpful 💙

- Use different colors: A mix of sweet peppers gives you great flavor and color.
- Don’t skip the paper bag: It helps steam the peppers so the skins peel off more easily.
- Let them cool: Wait until the peppers are completely cool before peeling and slicing.
- Remove the seeds: Scrape out the seeds before slicing the peppers into strips.
Storage & Food Safety
Store the roasted peppers with the garlic and olive oil in a covered container in the refrigerator at 40°F or below. Because this recipe contains fresh garlic in oil, USDA guidance recommends using homemade garlic-in-oil mixtures within 7 days. For longer storage, freeze the peppers instead. Ask USDA
Important Canning Note: This recipe is not intended for home canning or pantry storage. The FDA warns that improperly canned low-acid foods can allow Clostridium botulinum to grow and cause botulism. Low-acid vegetables require approved, scientifically tested canning procedures; a boiling-water bath is not considered adequate for low-acid foods. U.S. Food and Drug Administration
If you want to can peppers, use a tested USDA/National Center for Home Food Preservation recipe and follow its exact processing method. Their tested plain-pepper method, for example, uses a pressure canner.
Roasted Peppers

Roasted Peppers with Garlic and Olive Oil are tender, flavorful sweet peppers tossed with fresh garlic and olive oil.
Ingredients
- 20 sweet peppers, assorted colors
- 6 cloves garlic, chopped
- 3 cups olive oil
- 1 cup water
Instructions
- Preheat the oven to 350°F.
- Place the whole peppers on a baking sheet and add 1 cup water to the bottom of the pan.
- Roast for about 1 hour, or until the peppers are tender.
- Immediately place the roasted peppers in a brown paper bag and let them cool completely.
- Peel the skins from the peppers and remove the seeds.
- Slice the peppers into strips.
- Place the peppers in a large bowl. Add the olive oil and chopped garlic and toss to combine.
- Transfer to a covered container and refrigerate.
Notes
Placing the hot roasted peppers in a paper bag helps steam them and makes the skins easier to remove. This is a refrigerator recipe and is not intended for home canning or pantry storage.
Recommended Products
As an Amazon Associate and member of other affiliate programs, I earn from qualifying purchases.



Nutrition Information:
Yield:
20Serving Size:
1Amount Per Serving: Calories: 359Total Fat: 38gSaturated Fat: 5gUnsaturated Fat: 33gSodium: 4mgCarbohydrates: 8gFiber: 2gSugar: 5gProtein: 1g
Can you roast peppers & then place whole in freezer bags & freeze?
Yes you can
This year was a fantastic pepper year for my garden, I always use my green bell peppers in stewed tomatoes with celery and onions. My colored bell peppers are used for salsa’s and relishes, however this year I have an over abundance of all my bell peppers so I decided to can just roasted peppers. I looked all day yesterday for a good recipe, every recipe said must be done in a pressure cooker to be safe, (after all these years I am still leery about using one). I found your recipe last night and thought it was perfect, so I want to double check and make sure this recipe is SAFE in a water bath.
Hello, Will you please respond to Debbie, below, regarding the assurance that this method is safe (without using any acidity like vinegar) and to use in a water bath canner verses a pressurized canner. I have read several other recipes and repeatedly read where they said it could not be done. I thank you for your understanding and just want to make sure I understood correctly. Thanks so much!
I did mine in a water bath and it was fine
I did mine in a water bath and they were very good
do you put a pan of water under the peppers while roasting or do you put the water with the peppers